やりたいこと
Arduinoとイーサネットシールドを使って、サーバー(PHP)へデータを送ってみたい。
やること
・Arduinoにタクトスイッチを3つ(青・黄・緑)つなぐ。
・各スイッチを押すと、Blue・Yellow・Greenの文字列と、起動してからの経過時間をサーバーへ送信する。
・サーバー側はPHPでデータを受け取り、ログファイルへ出力する。
・ログファイルをtailコマンドで眺める。
必要なもの
・Arduino
・イーサネットボード
・ブレッドボード
・タクトスイッチ ×3
・10KΩ抵抗 ×3
・ジャンパーコード x6
・PHPの動くサーバー
配線図
・青色のタクトスイッチを5番ピンへ
・黄色のタクトスイッチを7番ピンへ
・緑色のタクトスイッチを9番ピンへ
・抵抗は10KΩを各GND線へ(プルダウン抵抗・タクトスイッチが押されていない時に0Vになるように)

配線図(Fritzing)
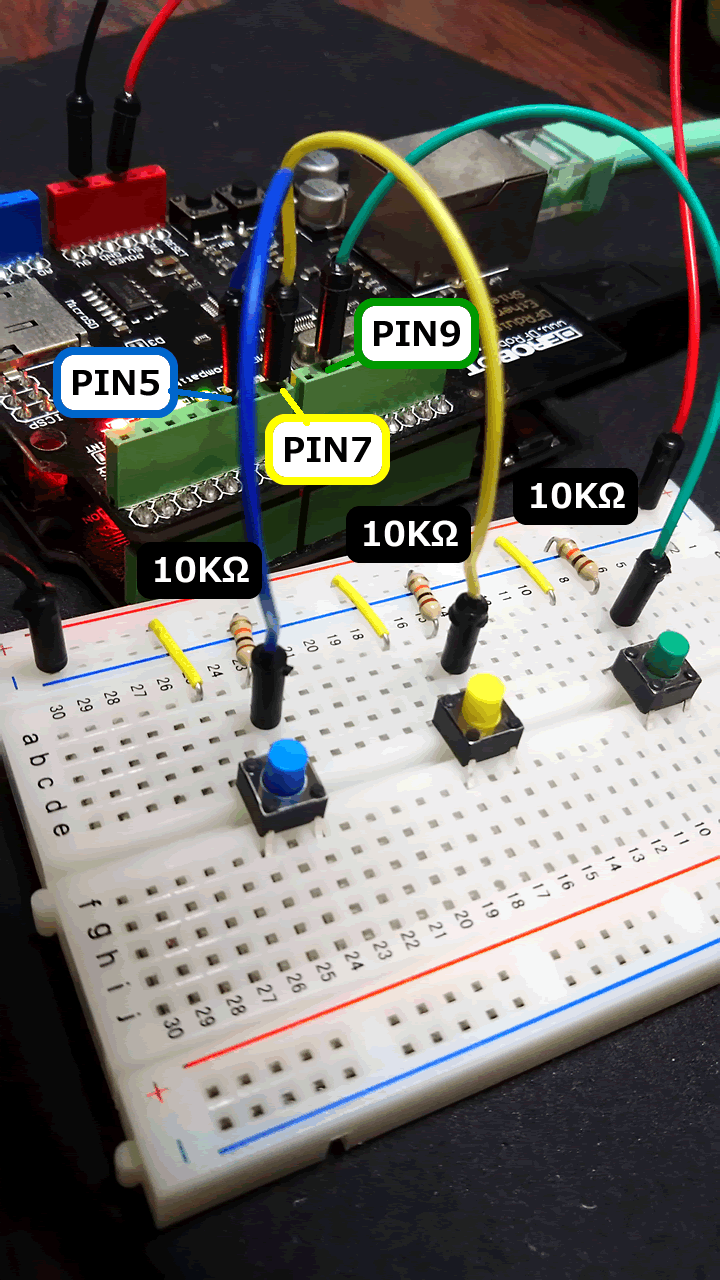
配線図(実物)
送信側プログラム(Arduino)
・POST先のURLは「http://www.example.jp/path/to/endpoint.php」とする。
・青色のタクトスイッチを押すとtitle=Blue, message=time-[経過ミリ秒数] をPOSTする。
・黄色のタクトスイッチを押すとtitle=Yellow, message=time-[経過ミリ秒数] をPOSTする。
・緑色のタクトスイッチを押すとtitle=Green, message=time-[経過ミリ秒数] をPOSTする。
|
1 2 3 4 5 6 7 8 9 10 11 12 13 14 15 16 17 18 19 20 21 22 23 24 25 26 27 28 29 30 31 32 33 34 35 36 37 38 39 40 41 42 43 44 45 46 47 48 49 50 51 52 53 54 55 56 57 58 59 60 61 62 63 64 65 66 67 68 69 70 71 72 73 74 75 76 77 78 79 80 81 82 83 84 85 86 87 88 89 90 91 92 93 94 95 96 97 98 99 100 101 102 103 104 105 106 107 108 109 110 111 112 113 114 115 116 117 118 119 120 121 122 123 124 125 126 127 128 129 130 131 132 133 134 135 136 137 138 139 140 141 142 |
#include <SPI.h> #include <Ethernet.h> //入力ピンの設定 #define PIN_INPUT_BLUE 5 #define PIN_INPUT_YELLOW 7 #define PIN_INPUT_GREEN 9 //MACアドレス(適当に) byte mac[] = {0x02, 0x02, 0x02, 0x02, 0x02, 0x02}; //IPアドレス(適当に) byte ip[] = {192, 168, 0, 123}; //接続先のURL char HOST[] = "www.example.jp"; String END_POINT = "/path/to/endpoint.php"; EthernetClient client; void setup() { pinMode(PIN_INPUT_BLUE, INPUT); pinMode(PIN_INPUT_YELLOW, INPUT); pinMode(PIN_INPUT_GREEN, INPUT); Serial.begin(9600); delay(500); while (!Serial) { ; } delay(1000); Ethernet.begin(mac, ip); delay(3000); Serial.print("IP: "); Serial.println(Ethernet.localIP()); Serial.println("Ready..."); Serial.println(); } bool onBlue = false; bool onYellow = false; bool onGreen = false; void loop() { int blue = digitalRead(PIN_INPUT_BLUE); int yellow = digitalRead(PIN_INPUT_YELLOW); int green = digitalRead(PIN_INPUT_GREEN); switch (blue) { case HIGH: if (!onBlue) { Serial.println("BLUE ON"); post("Blue", "time-" + String(millis(), DEC)); delay(1000); onBlue = true; } break; case LOW: if (onBlue) { Serial.println("BLUE OFF"); onBlue = false; } break; default: break; } switch (yellow) { case HIGH: if (!onYellow) { Serial.println("YELLOW ON"); post("Yellow", "time-" + String(millis(), DEC)); delay(1000); onYellow = true; } break; case LOW: if (onYellow) { Serial.println("YELLOW OFF"); onYellow = false; } break; default: break; } switch (green) { case HIGH: if (!onGreen) { Serial.println("GREEN ON"); post("Green", "time-" + String(millis(), DEC)); delay(1000); onGreen = true; } break; case LOW: if (onGreen) { Serial.println("GREEN OFF"); onGreen = false; } break; default: break; } } bool post(String title, String message) { Serial.println("connecting..."); if (client.connect(HOST, 80)) { Serial.println("connected"); String query = "title=" + title + "&message=" + message; client.println("POST " + END_POINT + " HTTP/1.1"); client.print("Host: "); client.println(HOST); client.println("Content-Type: application/x-www-form-urlencoded"); client.println("User-Agent: Arduino Post Client"); //ここは無くてもOK //client.print("Post-Title: "); //client.println(title); //client.print("Post-Message: "); //client.println(message); client.print("Content-Length: "); client.println(query.length()); client.println("Connection: close"); client.println(); client.print(query); Serial.println(query); Serial.println("sent"); delay(500); client.stop(); return true; } return false; } |
受信側プログラム(PHP)
・ArduinoからのPOSTを受け取って、同じディレクトリ内の「log」ファイルに日時とデータを出力する。
|
1 2 3 4 5 6 7 |
<?php ini_set('date.timezone', 'Asia/Tokyo'); $log = '[' . (new DateTime())->format('Y-m-d H:i:s') . '] ' . file_get_contents("php://input") . PHP_EOL; file_put_contents('./log', $log); exit; |
結果
サーバーに接続してlogファイルをtailしながら、タクトスイッチを押してみて、以下のようになればOK。
|
1 2 3 4 5 |
[user@host ~]$ tail -f log [2016-03-13 00:07:12] title=Blue&message=time-142954 [2016-03-13 00:09:13] title=Green&message=time-45310 [2016-03-13 00:13:18] title=Blue&message=time-290367 |